Author: ElectricBikeReview.com via YouTube

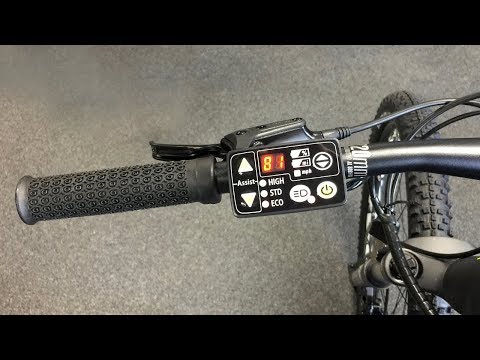
While visiting the Electric Bicycle Center in Southern California, I was able to spend some time digging into the basic Yamaha LED display panel control pad on a Haibike SDURO. This display is often used in conjunction with the Yamaha PW drive system. In this video, I show how to navigate, cycle through readouts, and activate lights (if they are wired-in). This display is very simple, but actually one of my favorite options for affordably priced ebikes because it offers so much more information than the really basic five-led readouts and ones that don’t show your speed, battery percentage, or range. It is not removable but may offer some angle adjustability if the mount isn’t overtightened. It has a bright orange color that can be dimmed when you press the light button. There are no USB charging ports built in and I’m not sure if the software or can be updated… I’m not even sure if you can change the units from miles to kilometers (please chime in if you know!) it may be set based on the country where the bike is being sold.
Display Panel Buttons: Assist Level Up, Assist Level Down, Menu Cycle (Battery Percentage, Estimated Range, Current Speed), Lights, Power
Assist Levels: HIGH, STD, ECO
Readouts: Battery Percentage, Estimated Range (in Miles), Current Speed (in Miles)
Pros: The control pad and display unit are combined to be fairly compact, and they are positioned within reach of the left grip for easy pressing. It draws much less power than a fully backlit color LCD unit and is less expensive to replace in the event of an accident or theft. It blends in well with the black grips, bars, and brake levers of most electric bikes and leaves plenty of space for mounting your own accessories on the right side of the bar (such as a Garmin). The orange LED menus are easy to read in bright light and have a high and low brightness that changes when you click the lights button. There’s no coin battery inside, so there’s nothing to run out or replace… this display runs off of the main ebike battery. I’m told that you can upgrade from this simpler PW display to a fancy one with the LCD readout and Micro USB charging port if you work with an ebike shop and pay roughly $200.
Cons: I’m not sure that there is any walk mode, the display cannot be removed without tools, there’s no USB charging port built in for use with your own portable electronics, you don’t get deeper feedback about distance traveled, odometer, average speed, max speed, and I don’t know how to change units from mph to km/h.
To compliment this video, I have created a post in the EBR forums with written instructions and pictures which you can visit here: https://electricbikereview.com/forum/threads/yamaha-pw-led-display-overview.26438/
